The first Wave 13 preview brings us the Resistance’s new ship, the B/SF-17 Bomber in the Turn the Tide of Battle article. It’s a bulky looking ship, with a statline to match and some interesting new tricks for bombing your opponent in new ways.
The Ship
The B/SF-17 has a durable but low offence base profile with a 2 attack primary weapon turret, 1 agility, 9 hull, and 3 shields. It’s got a sparse action bar with just the focus and target lock actions on its action bar. The upgrade bar is pretty bomb focused, with two Bomb slots alongside a System and Tech slot.
So, a big old stack of hull and shields but not the hugest amount of bite as a 2 dice turret isn’t going to be doing the hugest amount against a lot of ships. Without a torpedo slot, there’s no room for Extra Munitions, but there’s a solution for that problem in the pack that we’ll look at in the Upgrades section. The double Bomb slot also lets the B/SF-17 take a Bomblet Generator, which may prove a good fit on a ship that’s fundamentally reliant on its ordnance for any meaningful damage output.
Notably, there’s no crew slot on this ship, likely a deliberate move to stop you from equipping Sabine Wren on it. If you want her to enhance your bombs, you’re going to need to find a crew slot elsewhere in your list. Sadly, this also rules out the Bombardeer, which would be a solid addition to this ship.
The Dial
While not included in the main preview article, we got a look at the dial for the B/SF-17 via the Spikey Bits unboxing video that dropped shortly before the Turn the Tide of Battle article. It’s a distinctly “OK” dial, nothing exceptional either way. On the plus side, it has a 0 stop move, which combines nicely with some other upgrades in the pack for some unexpected bombing options. It’s also got a 1 hard turn, albeit red, which gives it a tight turning option if it needs one. On the down side, there’s no K-turn or other 180 flip move on the dial, so keeping anything in arc isn’t going to be easy – not an issue for the most part, but will mean that anything with Autothrusters should be able to pretty easily avoid taking any damage from the B/SF-17’s turret.
There’s quite a lot of similarities between the B/SF-17 and K-Wing dials, which may let the two fly alongside each other reasonably well. I think this dial is probably “good enough” without really adding anything to particularly help this ship beyond the quite handy 0 stop.
The Pilots
The first thing to note is that none of the B/SF-17 pilots have an Elite Pilot Talent slot, so they’re all based on the same upgrade bar. This sadly rules out quite a lot of options for them, although does seem to be something of a tradition for dedicated bombing ships like the K-Wing and TIE Punisher. This means that the abilities on the unique named pilots will be all the more important, as they’re the main distinguishing feature from one to another.
Crimson Squadron Pilot
The one generic pilot for this ship (as it tradition for large base ships), the Crimson Squadron Pilot comes in at 25 points and PS 1. The low PS may actually be an advantage for both blocking and dropping action bombs, so is probably actively preferable to PS 2 on this particular platform. It seems like a reasonably fair price point given the B/SF-17’s basic statline, but you’re going to need to stick some upgrades on this before it really does anything. Realistically, you’ll be looking at 30-33 points to kit one out well (Bomblet Generator, Trajectory Simulator, and Deflective Plating taking you quickly to 30 points), at which point you’re investing almost a third of your list into a 2 attack ship. Those bombs are going to need to do some serious work!
In isolation, it looks OK. However, when compared to the named pilots, the Crimson Squadron Pilot looks surprisingly expensive. I was expecting something more in the 23 point range based on early previews, which would have been a significant improvement. I suspect this ship may be suffering slightly from some over caution on the designer’s part following the dominance of the Contracted Scout and will join the ranks of “slightly too expensive” generic pilots that seems to have been a feature of the game for a while.
Despite that, I think there’s going to be a place for this ship. It’s pretty beefy, can block up lanes of approach with its large base and bombs, and has some tricks unique to it that will probably make it worth the points.
“Crimson Specialist”
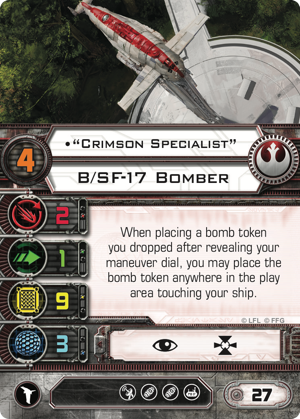 The first of the B/SF-17’s named pilots, Crimson Specialist bumps up to PS 4 and gains a pilot ability for 27 points. As with all of the B/SF-17’s pilot abilities, Crimson Specialist is focused on bombing.
When placing a bomb token you dropped after revealing your manoeuver dial, you may place the bomb token anywhere on the play area touching your ship.
So that gives you a lot of options about where you want that bomb template to go, particularly when combined with some of the other upgrades in this pack. The B/SF-17’s large base is a distinct asset here, allowing you to create a huge potential no-go zone for your opponent to plan around. Combined with the 0 stop on the dial and not having to worry too much about catching yourself in the explosion of the bombs you drop thanks to Deflective Plating (more on that later) you can really stop off a whole line of approach.
This is probably the B/SF-17 pilot I’m the most excited for, just because of the level of shenanigans that the pilot ability opens up. I’m not sure it’s particularly competitive, but it seems like it’s going to be incredibly fun…
“Cobalt Leader”
Next up, Cobalt Leader gets bumped up to PS 6 for 28 points. Unlike the rest of the B/SF-17 pilots, Cobalt Leader’s ability is focused around Action bombs rather than drop on reveal bombs, which is going to make them interesting to use.
When attacking, if the defender is at range 1 of a bomb token, the defender rolls 1 fewer defense die, to a minimum of 0.
So, penalizing your target’s defense dice is always nice, particularly on a 2 attack ship that might otherwise struggle to get any damage through. However, it’s reliant on a few things to work. First of all, this only works with Action bombs that stick around after the end of the Activation phase (or Rebel Nym holding a drop on reveal bomb on the board, but that’s a corner case). Secondly, those Action bombs need to have not been detonated, so you need to have missed your opponent’s ship or have dropped a bomb in preparation for next turn’s move. Thirdly, you need to not overlap these bombs with your own large base.
That’s fairly situational to my mind, but might work OK with Cluster Mines which are more likely to have some of their number stick around even if you successfully land most of the templates when you drop them. However, you’re looking at 36 points for Cobalt Leader with Cluster Mines, Ordnance Silos, and Fire Control System (so you’ve got some attack mods on the turn you use your action to drop the Cluster Mines) so it’s not a cheap option. There might be a place for this with the recent Advanced SLAM nerf, but I’m going to have to try it out to be convinced.
“Crimson Leader”
 Finally, we’ve got Crimson Leader at PS 7 and 29 points. Crimson Leader comes with a new Condition that makes your bombs all the more deadly!
When attacking, if the defender is inside your firing arc, you may spend 1 (hit) or (crit) result to assign the “Rattled” Condition to the defender.
Rattled
When you suffer damage from a bomb, you suffer 1 additional critical damage. Then, remove this card.Action: Roll 1 attack die. On a (focus) or (hit) result, remove this card.
So, a straight damage buff to any bombs the target gets hit by, and in the form of critical damage at that. That’s pretty potent, and would obviously combo well with Sabine being in the same list to potentially make a bomb devastatingly lethal. As you’re only talking about a 2 attack ship, cancelling a hit or crit on an attack isn’t the worst thing in the world either, as you’re quite possibly not going to get any damage through anyway.
 However, the key aspect of this is “if the defender is inside your firing arc”. On a large, slow ship with middling PS and no K-turns you’re not going to have enemy ships in your arc that frequently. I’d be surprised if this Condition gets applied more than a couple of times each game at most, so you’re going to need to make the most of that extra damage.
At 29 points base, Crimson Leader isn’t cheap either, so you’re going to want to carefully balance the points you spend on them against making sure the rest of your list is effective. And of course, if you want Sabine she’ll have to go on a different ship!
Rattled seems strong enough for Crimson Leader to get some play, although joins the ranks of other strong Rebel bombing options like Captain Nym and Sabine Wren crew. As such, he’s competing with some very strong alternative options unless you just go all in for an entirely bombing focused list. It’ll be interesting to see if he can find a place alongside these very popular upgrades!
Upgrades
There’s a swathe of new upgrades in this pack, but also a few existing bombs as well. You get two copies of Conner Net (plus templates) as well as a copy of Seismic Charges and Thermal Detonators, giving you some decent ordnance options right out of the box. There’s also a copy of Targeting Synchroniser, giving the Resistance access to some additional tech.
Advanced Optics
You cannot have more than 1 focus token.
During the End phase, do not remove an unused focus token from your ship.
Comm Relay for focus tokens but a point cheaper, this tech upgrade is a reasonable way of letting yourself bank an action for future use. It’ll be handy on quite a few ships, but really shines on Poe Dameron – take a focus on turn 1, and probably never need to do so again for the rest of the game! I think it’s a sound call to make it cheaper than Comm Relay, as you’ll need to spend your focus token more frequently than your evade, so outside of Poe it will often not give you any significant benefit outside of that banked token on the opening approach.
The one other pilot that’s going to get a huge amount out of this is Omega Ace. He’s now much more self-sufficient, not needing Push the Limit or an external focus or target lock to set up his ability for the first turn of combat. And at only 23 points for Omega Ace with Advanced Optics and Crack Shot, that’s potentially two or three painful crits going through early in the game if paired with higher PS wingmen to strip the target’s shields.
Crossfire Formation
B/SF-17 Bomber only.
When defending, if there is at least 1 other friendly Resistance ship at Range 1-2 of the attacker with the Crossfire Formation Upgrade card, you may add 1 (focus) result to your roll.
A defensive boost for the B/SF-17 and our first sub-faction dependant upgrade. The extra focus result on defence is nice, but not actually all that helpful on a ship that’s mostly relying on its hull and shields rather than agility to keep it alive. I’m certainly a bit dubious about it at 2 points – this feels much more like it should have been a 0 or 1 point title – but it may be that this is enough to let a B/SF-17 actually empty its ordnance silos before it dies…
However, the new design space created by sub-faction dependant upgrades is really interesting for the game, and potentially an easy way of encouraging thematic lists. I’d love to see this explored further and it may provide the solution to things like how to give upgrades to the T-65 X-Wing without boosting the T-70 in the process. I’m expecting to see more of this in future waves to let the designers do much more tightly focused upgrade design.
Deflective Plating
B/SF-17 Bomber only.
When a friendly bomb token detonates, you may choose not to suffer its effects. If you do, roll an attack die. On a (hit) result, discard this card.
Nice and straightforward, this allows the B/SF-17 to be much more cavalier with its ordnance. In particular, this combos very well with the 0 stop for both standard bomb drops and Crimson Specialist’s pilot ability, and with Trajectory Simulator to launch a bomb forward then just casually fly into its blast.
I’m not sure the randomized discard chance was really needed but this is still solid value at 1 point – as a bare minimum it’s saving you from a point of damage, and works even better with things like Ion Bombs, Thermal Detonators, and Proton Bombs that do more than just dish out some damage.
If you’ve got a spare point on your B/SF-17, this is almost an auto-include.
Ordnance Silos
B/SF-17 Bomber only.
When you equip this card, place 3 ordnance tokens on each other equipped (bomb) Upgrade card. When you are instructed to discard an Upgrade card, you may discard 1 ordnance token on that card instead.
The answer to the B/SF-17’s lack of a torpedo slot, Ordnance Silos gives you a sizeable stack of ordnance tokens on whatever bomb you equip. However, it does take up a bomb slot itself, meaning you’ll only have a choice of one bomb. Still, it’s a good alternative to both Extra Munitions and Bomblet Generator, likely giving you enough bombs to be fairly free about when you chose to drop them. And if you take Proton Bombs, you’re effectively getting 20 points worth of upgrades for 7 points!
This is going to be on every B/SF-17 that doesn’t have Bomblet Generator on it.
Trajectory Simulator
You may launch bombs using the (forward 5) template instead of dropping them. You cannot launch bombs with the “Action:” header in this way.
So, this lets you hurl bombs across the battlefield with effectively a souped up version of Deathrain’s ability to drop bombs out of the front of your base. That makes both the front and back of a bombing ship with this upgrade potentially dangerous, forcing your opponent to either be very cautious with their approach or just accept the fact there’s a strong chance of taking a bomb to the face.
As a System upgrade, there’s a limited number of ships that can equip and make use of this. The B/SF-17, TIE Punisher, and Scurrg with the Havoc title are the only real options unless you start adding bomb slots via Cad Bane or Sabine Wren crew. It’s obviously very useful on the B/SF-17 with its 0 stop manuever potentially trapping your opponent’s ships between a bomb and a range 1 shot. It’s also a genuine boost to the Punisher, letting you start to get use from your ordnance much earlier in the game – definitely a plus on a ship that can end up being focused down quite quickly. I’m less convinced by it on the Havoc, as the Scurrg normally has better uses for its System slot (particularly on Nym), but it might have some use there.
At only 1 point, this is a very affordable upgrade and changes the capabilities of your bombing ships in a significant way. I suspect we’ll see a decent amount of use for this in standard play, and it’ll be almost a must-take on bombing ships that can have it in Epic.
Final Thoughts
This is a ship I think is going to take a while to find a place. I genuinely think there’s some real potential here, but it’s different enough to anything else we’ve currently got in the game to take a bit of thought and experimentation to find where it fits. A combination of mediocre abilities and no EPT slot limits some of the named pilots, and the generic feels a bit more expensive than it should be. However, both Crimson Specialist and Crimson Leader have pilot abilities with some real value, and I think the Crimson Squadron Pilot can carry a lot of bombs on a pretty durable platform.
The upgrades include some pretty standout options. Deflective Plating and Ordnance Silos really give the B/SF-17 an identity of its own, and both Advanced Optics and Trajectory simulator will see a lot of use outside of just this ship. There’s not a huge amount in this pack for Scum players, but both Rebels and Imperials should be able to make good use of these upgrades.
And as a very final though, this ship is a completely different proposition in Epic! Two or three B/SF-17s will be able to lay down a lot of hurt to both Huge ships and the tightly packed formations you often see in Epic. I’m genuinely excited to take it for a spin the next time I get in an Epic game.

[…] There’s a few new cards in this pack, but also a handful of existing upgrades that were all in need of wider availability. You get two copies of Autothrusters and Primed Thrusters in this pack, alongside a copy of Sensor Jammer. Imperials will be particularly pleased by the first two, previously only available in the StarViper and Heroes of the Resistance packs respectively. There’s also two copies of the new Tech upgrade Advanced Optics, which I discussed in detail in the B/SF-17 preview. […]
LikeLike